iOS Service Onboarding
To automatically provision users for Apple corporate or BYOD device usage through Apple Business Manager, a trust must be established to Azure AD. To establish this trust, federation must be configured, directory sync enabled, enterprise application provisioned, and a MDM Push certificate generated.
Configure the Azure AD/Apple Business Manager federated authentication
-
Sign in to Apple Business Manager with an account that holds the role of Administrator or People Manager.
-
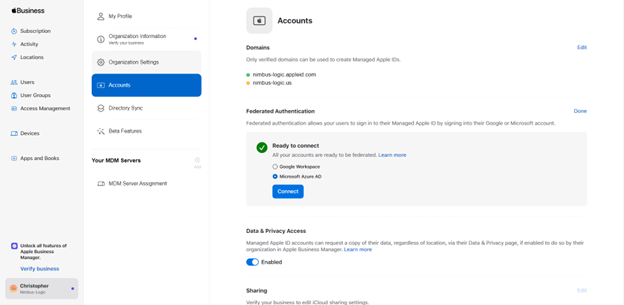
Click on your name at the bottom of the sidebar, then go to “Preferences” and select “Accounts”.
-
Next to Federated Authentication, click on “Edit”, and choose “Microsoft Azure AD” from the options. Click “Connect” to proceed.
-
Choose “Sign in with Microsoft,” and provide the credentials of a Microsoft Azure AD Global Administrator, Application Administrator, or Cloud Application Administrator account, then click “Next” to continue. Enter the account password, and click “Sign In.”
-
Once the sign-in is successful, click “Done” to complete the process.
-
In the Domains section, click “Edit,” then select “Add Domain.” Enter the desired domain and click “Continue.”
-
Click “Verify” next to the domain you added.
-
A TXT will appear next to the domain name. You have 14 calendar days to complete the verification by adding the provided TXT record to your DNS. The TXT record will contain a string of random characters, for example, “apple-domain-verification=RaNdOmLeTtErSaNdNuMbErS.”
-
Once the TXT record is added to the DNS. click “Verify” again.
-
Click “Federate” next to the domain you want to federate.
-
Select “Sign in to Microsoft Azure Portal” and enter your Azure AD user name and password, then click “Done”.
After a successful sign-in, Apple Business Manager will check for any user name conflicts within this domain. Ensure that the user name conflict check is complete before using federated authentication with this domain.
Configure Apple Business Manager for Provisioning with Azure AD
-
Sign in to Apple Business Manager with an account that holds the role of Administrator or People Manager.
-
Click “Settings” at the bottom of the sidebar, then choose “Preferences,” and go to “Directory Sync.”
-
Click “Connect” next to “Microsoft Azure AD Sync.”
-
Copy Tenant URL and Token
Please note that this token is valid for one year. After this period, you will need to generate and configure a new token.
-
Sign in to Azure AD (GCC) or Azure AD (GCCH)
-
Navigate to Enterprise Applications, then select All applications.
-
Locate and select “Apple Business Manager” from the list of applications.
-
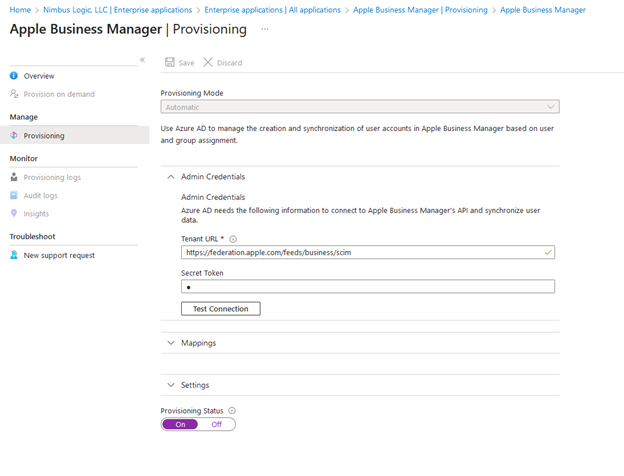
Go to the Provisioning tab.
-
Set the Provisioning Mode to “Automatic.”
-
Under the Admin Credentials section, input the SCIM 2.0 base URL and Access Token values retrieved from Apple Business Manager into the fields “Tenant URL” and “Secret Token” respectively. Click “Test Connection” to ensure Azure AD can connect to Apple Business Manager.
-
Under the Mappings section, choose “Synchronize Azure Active Directory Users to Apple Business Manager.”
-
Enable the Azure AD provisioning service for Apple Business Manager by changing the Provisioning Status to “On” in the Settings section.
-
Set the scope to “Only assigned users and groups,” and then click “Save.”
Configure iOS MDM Push Certificate
-
Sign into Intune Admin Center (GCC) or Intune Admin Center (GCCH) .
- Click on Devices -> Enroll Devices -> Apple MDM Push certificate.
-
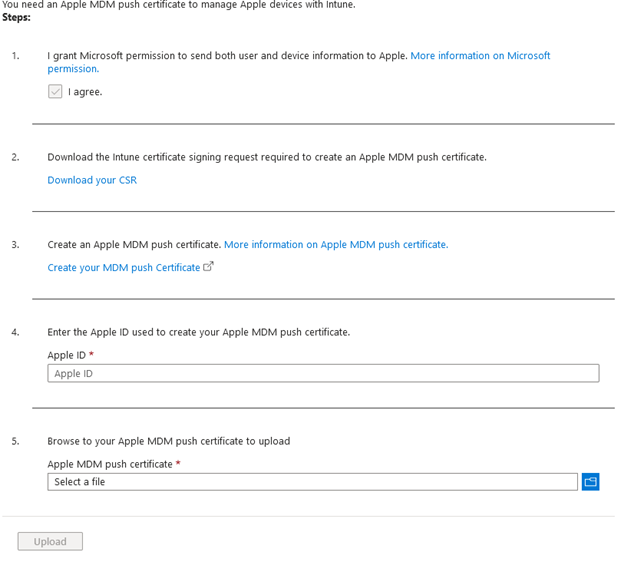
Agree to the Microsoft permissions by checking the box.
-
Download the Certificate Signing Request (CSR).
-
Click “Create your MDM push certificate” to redirect to Apple Business Manager sign-in.
-
Upload the CSR to generate the MDM push certificate.
-
Return to the Intune admin center and enter the Apple ID used to generate the certificate, then upload the certificate.
- Click “Upload.”