Information Protection
Sensitivity Labels
A sensitivity label is a way to classify and protect sensitive information within an organization. It is a metadata tag that can be applied to documents, emails, or other content, indicating the level of sensitivity and the appropriate level of protection that should be applied. Because of this metadata tag, sensitive information can be protected even after it has left the organizartion.
Sensitivity labels can help organizations to ensure that sensitive information is appropriately protected based on its level of sensitivity, and can help to prevent unauthorized access or leakage of sensitive information. They can also be used to automate the application of protection policies, such as encryption or access controls, based on the sensitivity level of the information.
Here are some features of a sensitivity label:
-
Labels can be customized: Organizations can create customized labels to fit their specific needs and policies. This allows for flexibility in the types of labels that can be applied to documents or emails.
-
Labels can include protection settings: Sensitivity labels can be configured to include protection settings such as encryption, watermarks, or the ability to restrict access or prevent forwarding or printing.
-
Labels can be automatically applied: Sensitivity labels can be configured to be automatically applied based on certain conditions, such as the location of the document, the sensitivity of the information, or the user accessing the document.
-
Labels can be used for classification and retention: Sensitivity labels can be used to classify documents based on their sensitivity level and can also be used to set retention policies for the documents.
-
Labels can be used across different platforms: Sensitivity labels can be used to classify and protect documents and emails across different platforms and applications, such as Microsoft 365, SharePoint, OneDrive, and Exchange.
How to apply a sensitivity label?
How you apply a sensitivity label will be different depending on the application you are working in.
Applying a sensitivity label to a file
When applying a sensitivity label to a file, several protections can be applied depending on the label’s configuration. Here are some common protections that can be applied:
-
Encryption: The file can be encrypted with a key that is only accessible to authorized users.
-
Watermarking: The file can be marked with a unique identifier or text that indicates its sensitivity level.
-
Access control: The sensitivity label can be used to control access to the file, limiting it to only authorized users or groups.
-
Retention: The sensitivity label can be used to control how long the file is retained and when it is automatically deleted.
-
Restricted sharing: The sensitivity label can be used to restrict the sharing of the file with external users or organizations.
-
Information Rights Management (IRM): The file can be protected by IRM, which allows you to control who can access, view, and edit the file, even after it’s been shared or downloaded.
These protections help ensure that sensitive files are kept secure and only accessible to authorized users.
To apply a label to a file in Word, PowerPoint, and Excel, click the “Home” tab located in the top toolbar, then select “Sensitivity” dropdown and select the label needed for this document:

Applying a sensitivity label to an email
When applying a sensitivity label to an email, several protections can be applied depending on the label and the configuration of your organization’s security policies. Some common protections that can be applied when applying a sensitivity label to an email include:
-
Encryption: The email can be automatically encrypted so that it can only be read by authorized recipients. This helps to protect the confidentiality of the email’s contents.
-
Marking: The email can be marked with a visual indicator, such as a banner or a watermark, that indicates the sensitivity level of the email. This helps to remind recipients to handle the email appropriately.
-
Access controls: The email can be configured so that only authorized recipients can access it. This can be done by setting permissions on the email itself or by using features such as Microsoft’s Information Protection to control access to the email.
-
Retention: The email can be configured to be automatically deleted after a certain period of time. This helps to ensure that sensitive information is not retained for longer than necessary.
-
DLP Policies: Data Loss Prevention policies can be configured to automatically detect, classify and protect sensitive information contained in emails. For instance, policies can be set up to prevent sending of sensitive data outside the organization or flagging of suspicious activities.
To apply a label to an email in Outlook, click the “Options” tab located in the top toolbar, then select the “Sensitivity” dropdown and select the label needed for this email:

Applying a default sensitivity label to a SharePoint Document Library
When a default sensitivity label is applied to a SharePoint document library, the following protections can be applied:
-
Automatic labeling: SharePoint can automatically apply the default sensitivity label to documents based on pre-defined rules. This ensures that sensitive information is always properly labeled.
-
Access controls: The default sensitivity label can be used to automatically apply access controls to documents within the library, such as restricting access to specific groups or users.
-
Encryption: The default sensitivity label can be used to automatically encrypt documents within the library, ensuring that they cannot be accessed by unauthorized parties.
-
Retention policies: The default sensitivity label can be used to apply retention policies to documents within the library, helping to ensure that sensitive information is only retained for the necessary amount of time.
-
Auditing and monitoring: SharePoint can automatically audit and monitor access to documents within the library, helping to ensure that sensitive information is being accessed and used appropriately.
A sensitivity label will only be applied to new or edited documents within a Document Library. Existing files will not have a label applied until they are edited or a label is manually applied.
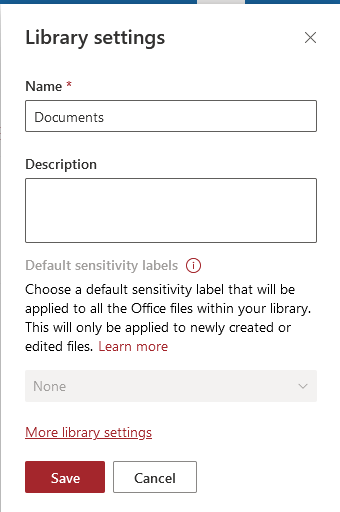
To apply a default sensitivity label to a site in SharePoint, navigate to SharePoint and locate the Document library you want to apply a label to, select the gear cog in the upper right-hand coner and select Library Settings. A dialog box will appear allowing a default sensitivity label to be applied:
Applying a sensitivity label to a SharePoint Site
When you apply a sensitivity label to a SharePoint site, you can enforce certain protections to help ensure the security and privacy of the site’s content. Some of the protections that can be applied include:
-
Access controls: You can use sensitivity labels to enforce restrictions on who can access a SharePoint site. For example, you can set permissions so that only members of a specific group can view or edit the site’s content.
-
Encryption: SharePoint supports encrypting site content at rest to protect sensitive information from unauthorized access. When you apply a sensitivity label to a site, you can specify whether encryption should be enabled.
-
Retention policies: You can use sensitivity labels to set retention policies that control how long site content is retained and when it should be deleted. This can help ensure that sensitive information is not kept longer than necessary.
-
Data loss prevention (DLP) policies: SharePoint supports DLP policies that can be used to prevent sensitive information from being shared or accessed inappropriately. When you apply a sensitivity label to a site, you can configure DLP policies to enforce rules around how sensitive information is handled and shared.
-
Activity monitoring and auditing: SharePoint provides detailed logs and reports that can be used to monitor activity on a site and identify potential security threats. Sensitivity labels can be used to help enforce auditing and monitoring policies by specifying which activities should be tracked and reported on.
It is important to note that applying a sensitivity label to a site will not apply a sensitivity label to the documents within that site and that the SharePoint owner can change the sensitivity label applied to the site which could result in a change in access controls such as web-only access, MFA, or blocking access from unmanaged devices.
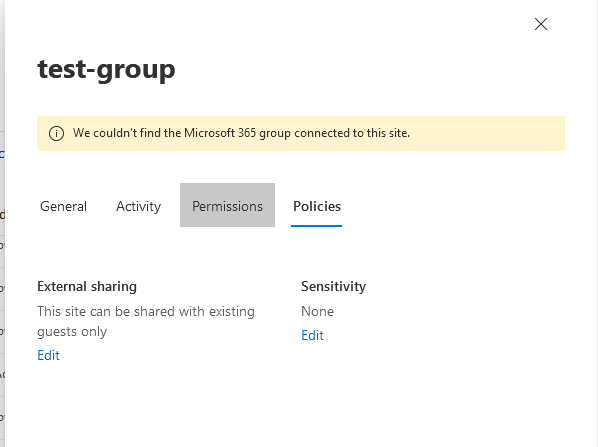
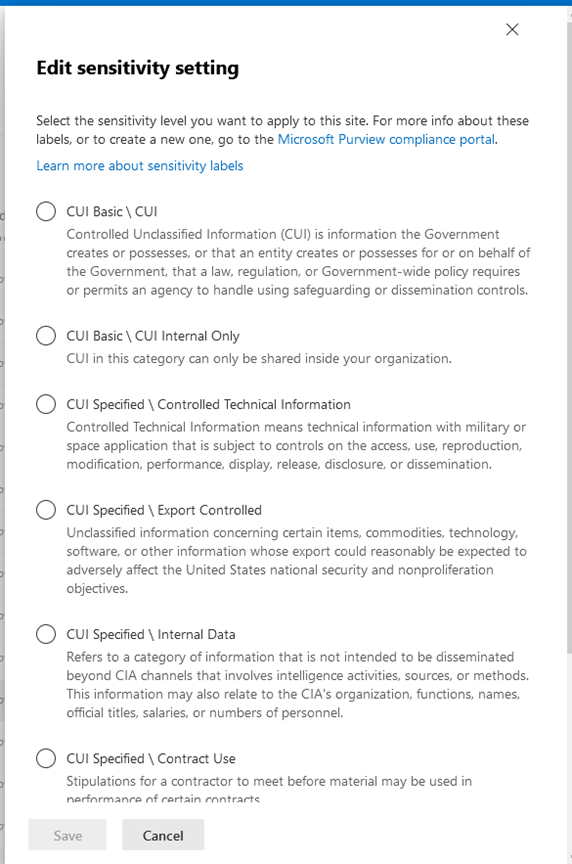
To apply a label to a site in SharePoint, navigate to SharePoint Admin, click “Active Site”, then select the site you wish to apply a label to. A separate dialog box will appear to the right, select “Policies, then “edit” under Sensitivity, and select the label needed:
CUI Basic Labels
CUI Content Marking Only
Controlled Unclassified Information (CUI) is information the Government creates or possesses, or that an entity creates or possesses for or on behalf of the Government, that a law, regulation, or Government-wide policy requires or permits an agency to handle using safeguarding or dissemination controls. CUI in this category only contain Content Markings.
Use Case
Use this label when a document, email, or site contains CUI and only content markings need to be applied.
Permissions
This label does not require permissions to access
Content Markings
Watermark: CONTROLLED
Header: CUI
Footer: Controlled by [Organization Name]
CUI
Controlled Unclassified Information (CUI) is information the Government creates or possesses, or that an entity creates or possesses for or on behalf of the Government, that a law, regulation, or Government-wide policy requires or permits an agency to handle using safeguarding or dissemination controls.
Use Case
Use this label when a document, email, or site contains CUI and needs to be accessible to External guests.
Permissions
Authenticated Users
Tenant Users & Guests
Content Markings
Watermark: CONTROLLED
Header: CUI
Footer: Controlled by [Organization Name]
CUI Internal Only
Controlled Unclassified Information (CUI) is information the Government creates or possesses, or that an entity creates or possesses for or on behalf of the Government, that a law, regulation, or Government-wide policy requires or permits an agency to handle using safeguarding or dissemination controls. CUI in this category can only be shared inside your organization.
Use Case
Use this label when a document, email, or site contains CUI and does not need to be accessible to External Guests.
Permissions
Assigned by security group (All employees dynamic recommended)
Content Markings
Watermark: CONTROLLED
Header: CUI
Footer: Controlled by [Organization Name]
CUI Specified Labels
Controlled Technical Information
Controlled Technical Information means technical information with military or space application that is subject to controls on the access, use, reproduction, modification, performance, display, release, disclosure, or dissemination.
Use Case
Use this label when a document, email, or site contains Controlled Technical Information and needs to be accessible to External guests.
Permissions
Authenticated Users
Tenant Users & Guests
Content Markings
Watermark: CONTROLLED
Header: CUI
Footer: Controlled by [Organization Name]
Export Controlled
Unclassified information concerning certain items, commodities, technology, software, or other information whose export could reasonably be expected to adversely affect the United States national security and nonproliferation objectives.
Use Case
Use this label when a document, email, or site is Export Controlled and needs to be accessible to External guests.
Permissions
AuthenticatedUsers
Tenant Users & Guests
Content Markings
Watermark: CONTROLLED
Header: CUI
Footer: Controlled by [Organization Name]
Internal Data
Refers to a category of information that is not intended to be disseminated beyond CIA channels that involves intelligence activities, sources, or methods. This information may also relate to the CIA’s organization, functions, names, official titles, salaries, or numbers of personnel.
Use Case
Use this label when a document, email, or site contains Internal Data and needs to be accessible to External guests.
Contract Use
Stipulations for a contractor to meet before material may be used in performance of certain contracts.
Use Case
Use this label when a document, email, or site contains Contract Use information and needs to be accessible to External guests.
Permissions
Authenticated Users
Tenant Users & Guests
Content Markings
Watermark: CONTROLLED
Header: CUI
Footer: Controlled by [Organization Name]
General Privacy
Refers to personal information, or, in some cases, personally identifiable information, as defined in OMB M-17-12, or means of identification as defined in 18 USC 1028(d)(7).
Use Case
Use this label when a document, email, or site contains General Privacy Information and needs to be accessible to External guests.
Permissions
Authenticated Users
Tenant Users & Guests
Content Markings
Watermark: CONTROLLED
Header: CUI
Footer: Controlled by [Organization Name]
Personnel Records
Related to the employees of federal agencies.
Use Case
Use this label when a document, email, or site contains Personnel Records and needs to be accessible to External guests.
Permissions
Authenticated Users
Tenant Users & Guests
Content Markings
Watermark: CONTROLLED
Header: CUI
Footer: Controlled by [Organization Name]
Email Encryption
Overview
With Office 365 Message Encryption (OME), you can send and receive encrypted email messages between people inside and outside our organization. Office 365 Message Encryption works with Office 365, Yahoo!, Gmail, and other email services. Email message encryption helps ensure that only intended recipients can view message content.
How to Use Message Encryption (OME)
There are two ways to apply message encryption to any email you compose.
- Automatic encryption based on subject keyword
Your exchange online has been configured to automatically apply message encryption if the subject contains any of these key words:- CUI or C.U.I.
- Confidential
- Setting Message Properties in Outlook
- Outlook on the web - browser
- Log into Outlook on the web
- Go to Outlook
- Open a new email message or reply to an existing message.
- Within the message window, click Encrypt link located at the top of the message window. The following data will appear in the message window:

- The default is set to “Encrypt”. If you want to change this encryption, use the ‘Change Permissions’ link.
- After you have entered the rest of the message details, send the message - the recipient(s) will receive this message in the encrypted format you selected above.
- Outlook for Windows/Mac
- Start Outlook.
- Confirm you are authenticated correctly - if not, fix this issue before proceeding.
- Open a new email message or reply to an existing message.
- Go to Options menu.
- Click Encrypt button and select the desired encryption you want to use. For Outlook 2019 and Outlook 2016, in an email message, choose Options, select Permissions
- After you have entered the rest of the message details, send the message - the recipient(s) will receive this message in the encrypted format you selected above.
- Outlook on the web - browser